

How to Flash Samsung Stock Firmware Using Odin
A complete walkthrough on how to flash official Samsung stock firmware using Odin. Learn the correct USB Download Mode sequence for One UI devices, the difference between CSC and HOME_CSC, and how to avoid binary rollback check failures.
Pre-Flight Checklist
Complete ALL items before proceeding. Skipping any step increases the risk of bricking your device.
Guide Steps
Extract your downloaded firmware ZIP archive. Inside the folder, you will find four or five files ending in .tar.md5:
BL_...tar.md5— Bootloader partition binaries.AP_...tar.md5— Application processor package (the main system, super, boot, and recovery images). This is the largest file.CP_...tar.md5— Cellular modem and baseband radio firmware.CSC_...tar.md5— Consumer Software Customization (carrier configs, regional partitions, and clean factory re-partition script).HOME_CSC_...tar.md5— Alternative CSC file designed to update system files without wiping user data.USERDATA_...tar.md5— Carrier-specific user partition file (found primarily on US carrier models; leave slot empty if absent).
Samsung firmware bundles two different CSC files. Select only ONE of them when setting up Odin:
- Use CSC: Performs a full factory reset and re-partitions storage. This is strongly recommended for unbricking a phone, fixing bootloops, or changing regional firmware.
- Use HOME_CSC: Updates your system software while keeping your personal photos, messages, apps, and accounts intact. Best for routine manual One UI updates.
Samsung changed how modern phones enter Download Mode. Follow the method matching your hardware generation:
Modern Galaxy (S20, S21, S22, S23, S24, Note 20, A-series, Z Fold/Flip running One UI):
- Power off your phone completely and wait 10 seconds.
- Press and hold Volume Up + Volume Down together.
- While holding both buttons, plug in the USB-C cable connected to your PC.
- Release the buttons as soon as the teal/blue "Warning" screen appears.
- Press Volume Up once to confirm and enter Download Mode.
Legacy Galaxy Devices:
- Galaxy with physical Home key (S7 and older): Power off, then hold
Volume Down + Home + Power. Press Volume Up on the warning screen. - Galaxy with Bixby key (S8, S9, S10, Note 8, Note 9): Power off, then hold
Volume Down + Bixby + Power. Press Volume Up on the warning screen.
Right-click Odin3.exe and select "Run as administrator".
With your phone displaying the Download Mode screen and plugged in, look at the top-left section of Odin. The box under ID:COM should highlight in light blue or cyan with a port label (e.g., 0:[COM4]), and the log window on the bottom-left will display Added!!.
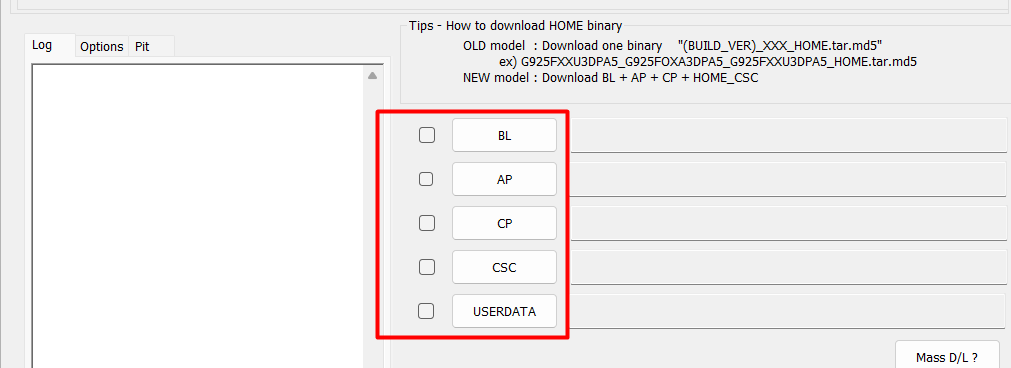
Click each slot button in Odin and select its corresponding file from your firmware folder:
- BL: Select the file beginning with
BL_... - AP: Select the file beginning with
AP_... - CP: Select the file beginning with
CP_... - CSC: Select
CSC_...(for a clean factory install) ORHOME_CSC_...(to keep personal files). - USERDATA: Select
USERDATA_...if present in your firmware download; otherwise leave this slot blank.
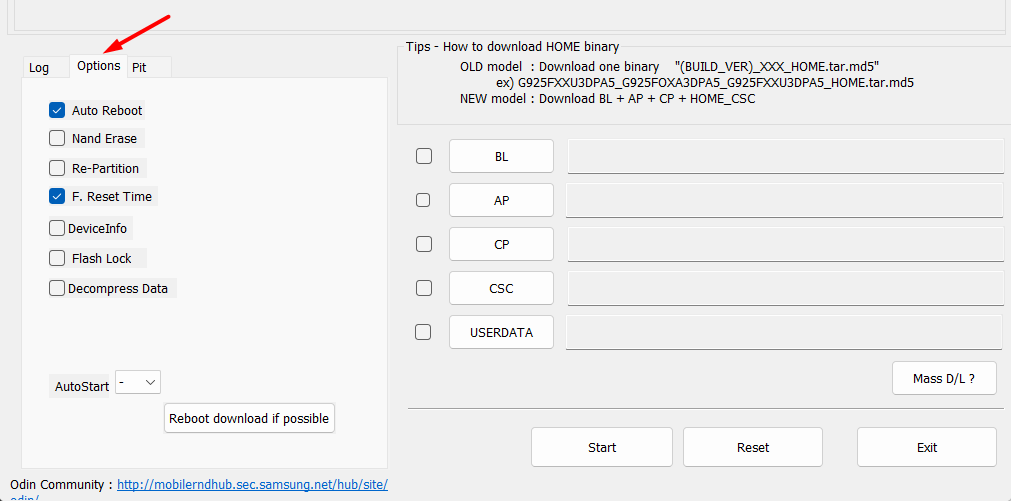
Click on the Options tab in Odin and verify the settings:
- ✅ Auto Reboot — Checked (automatically reboots the phone once flashing finishes successfully).
- ✅ F. Reset Time — Checked (resets the internal flash timer).
- ❌ Re-Partition — MUST BE UNCHECKED. The CSC package handles all necessary partition adjustments automatically. Checking this manually without an explicit PIT file can damage your partition tables.
- ❌ NAND Erase — Unchecked.
Click the Start button in Odin. The log panel will begin writing partitions (pit, sboot, param, boot, recovery, super / system, modem).
A green progress bar will advance above the ID:COM box, and a white progress bar will fill across your phone's screen. Flashing usually takes between 3 to 8 minutes.
When flashing finishes, Odin will display a large green box with PASS!, and the log will read All threads completed. (succeed 1 / failed 0).
- Your phone will reboot automatically.
- Once the Samsung splash screen appears, you can safely disconnect the USB cable.
- The initial boot takes 5 to 10 minutes while One UI configures system files. Once the "Welcome" setup screen appears, follow the on-screen steps.
Congratulations! Flash Successful!
You've successfully completed all steps. Your device should now be running the new firmware. If it's booting normally — you're done! Check the troubleshooting section below if you encounter any issues.
Troubleshooting & FAQ
Common errors and their solutions. Read this before asking for help.
This is Samsung's hardware rollback protection. It means your phone has bootloader binary version X fused in hardware, but you are trying to flash a firmware package with an older binary version Y.
Samsung strictly prevents downgrading to an older bootloader binary. To resolve this:
- Look at the build number of your firmware. The binary bit is the 5th character from the right (e.g. in
S908BXXU7CXB5, the binary is 7). - Check the error on your phone screen: if it says "Fused 7 > Binary 6", you cannot flash binary 6.
- Download a newer firmware release whose 5th character from the right matches or is higher than your device's fused binary bit.
When Odin hangs on SetupConnection, it cannot establish a reliable handshake with the phone's bootloader modem port.
- Disconnect the phone, close Odin, and restart your computer.
- Connect the USB cable to a direct rear USB port on your PC, avoiding USB 3.1 gen 2 ports or hubs.
- Use an original Samsung USB cable.
- Uninstall third-party PC suites (like Smart Switch) or kill their background processes in Task Manager before launching Odin.
No. Flashing 100% official, unmodified Samsung stock firmware matching your model will NOT trip Knox. Your Knox warranty counter will remain at 0x0, and Samsung Pay, Secure Folder, and Samsung Pass will continue working normally.
Knox is only permanently tripped to 0x1 if you flash custom binaries, custom recoveries (such as TWRP), or root packages (such as Magisk).
If you flashed using HOME_CSC over an older Android version or a different regional CSC, leftover application cache can cause a bootloop.
- Turn off the phone. Hold Volume Up + Power while connected to a PC via USB to enter Samsung Android Recovery.
- Use the volume keys to highlight Wipe cache partition, then press Power to confirm.
- If it still bootloops, re-enter Odin Download Mode and re-flash using the full CSC file (not HOME_CSC) to perform a clean factory installation.
This error indicates the firmware file is either corrupted or you are attempting to flash a firmware package intended for a different model variant (such as flashing SM-S908U firmware onto an SM-S908B device).
- Verify your exact model number in Settings or on the Download Mode screen.
- Re-download the firmware and verify its MD5 checksum before loading.
- If you are intentionally flashing across carrier variants of the same hardware (e.g. U to U1 on US models), use patched Odin (Odin3 v3.14.4_3B_Patched) which bypasses model verification checks.
Prioritize our guides in your Google search results.
No comments yet. Be the first to share your experience with this guide!